
Development, Mobile App Development, Domains & Web-Hosting Services, Bulk SMS , CCTV & Biometrics, Internet & Networking Solutions, Website Maintenance, ICT Consulting etc
Find Us
We Are Online 24/7 To help you with any issue
- Working Time24 hrs
- Contact+(254)740386944
- info@zillahtechnologies.co.ke
Follow Me
We are attempting to get the following 4 things:
- Paybill or Till number / Store number (in case you are using a Till number)
- M-PESA consumer key
- M-PESA secret key
- M-PESA passkey
Prerequisites
- Internet Browser
- Paybill or Till number (with withdraw to bank option)
- Obtain Admin Access to the G2 Portal
Safaricom has a portal known as the G2 portal which Paybill users can access their accounts. The link can be found here: https://org.ke.m-pesa.com/orglogin.action
However, you need to request access by filling out the following form:
- Mpesa Business Admin Account Activation Request Tempate –PDF Format
- MPESA Business Admin Account Activation Request Template –Word Format
Ensure it is signed and stamped by all the directors (single director if it’s a sole proprietorship). Attach copies of all your IDs and include a board resolution requesting for an Admin account (Also signed and stamped). Send the documents to: M-PESABusiness@safaricom.co.ke.
2. Setting up Web Operators
Prior to the current set up, Safaricom required you obtain a certificate so you can access the site. This has thankfully been abandoned in exchange for an OTP sent to the Admin’s phone number. After receiving your Admin credentials we now have to login to the platform and set up our account.
Input the OTP (One Time Passcode) sent to your phone number:
Once you have logged in, click on the Browse Organization Section
We now proceed to add an operator. Click on Operator and then add
We need to create an API User (API operator). Proceed to select API under Access channel as shown below and click Next:
Under Rule Profile, be sure to select Web Operator Rule Profile:
Next, it’s time to select the permissions of the API user. Click on Add just below and select the following permissions:
- Org B2C API initiator
- Bundle Purchase Org initiator
- Balance Query ORG API
- B2B Org API initiator
- Transaction Status Query ORG API
Of course, these permissions can be adjusted depending on your particular use case. If you are unsure, however, use the above list. Proceed to the Next step.
The next screen is a KYC screen (Know Your Customer). Ensure all the details filled are correct. Most importantly under the Preferred Notification Channel, select SMS. Input the phone number of choice and proceed next. Use the following format: 254722123456.
Click on Submit to finally create your API User.
We now need to create a Web Operator to access the platform later.
Please Note:
Web Operators have a default password expiry period after 90 days. Be sure to regularly change your web operator password or your account will go dormant, and you’ll have to contact Safaricom to activate it.
Click on Operators and Add once again 🙂
Select the Web Access Channel now.
Enter a memorable Username, be sure to take note of it. We’ll need this to login to the account later.
Under Rule Profile, select the Web Operator Rule Profile:
It’s time to assign permissions to our new user. Select Add and now we Add a series of new roles.
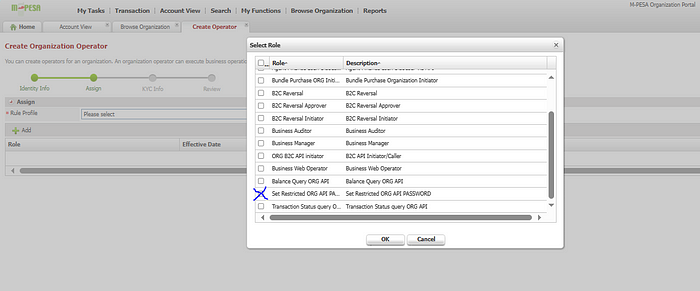
The permissions I would recommend you add are the following:
- Business Manager
- Business Web Operator
- Balance Query Org API
- Set Restricted Org API Password
- Transaction Status Query Org API
Ensure the Set Restricted Org API PASSWORD permission is selected. We will make use of it in a little while.
Hit Next and proceed to the KYC screen:
Remember to use the number format 254XXXYYYYYY and SMS as your Preferred Notification Channel.
Click on Submit to finally create your web operator.
You will receive an SMS on the number you listed containing your Username and Password. This password is temporary and you will be required to change it once you input it. So let’s log out and log in with the details provided.
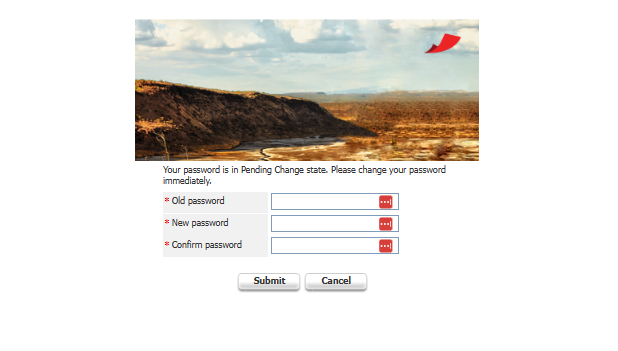
Pick a memorable but secure password. Next, we login to our web operator user with our password.
You will notice the platform has a couple of extra tabs. Let’s make use of one of them. Navigate to Search and click on Operator.

Our goal is to assign a password to our newly created API User.
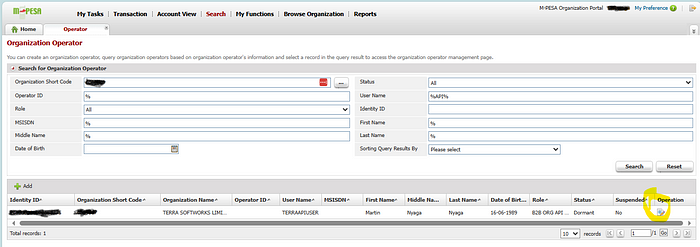
On this Operator screen, search for your API user that you created earlier and click on search. Remember the first user we created?

Once the search is successful, the user should show up. Click on the notepad icon at the very end of the user to edit the details shown below.
The API User profile screen should show up. We can edit most details as we see fit including assigning or revoking permissions. However, in our case, we are only interested in assigning a new password.
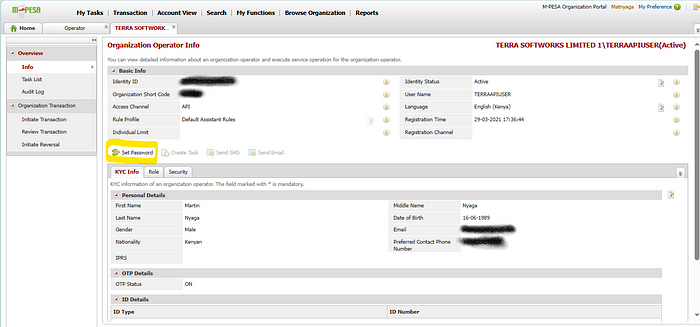
Click on Set Password and set a secure but memorable password for your API user.

Please Note:
Unlike the Web Operators the API User Passwords do not have an expiry date. I would highly recommend you follow this password guide to help you set up a secure password.
We are now done with the first part of setting up the keys. Take note of the users we have created; we will use them in the next step.
3) Setting Up the Safaricom Daraja Portal
We now have to assign those users to a Safaricom developer account. It’s time to visit the following URL: Daraja — Safaricom Developers’ Portal
We need to sign up for a Safaricom Developer account.
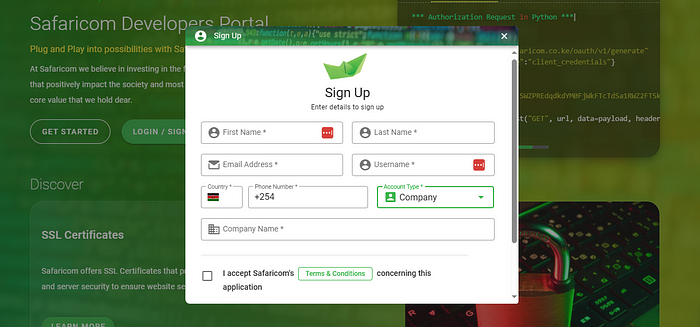
Please Note:
This process can be pretty frustrating because Safaricom sends you an OTP to verify your account with a pretty short expiry window. It doesn’t help that there’s sometimes delays, so the emails may arrive late. If this happens just keep retrying until you get it right.
Once we have sign up for a new account it is time to go back to the login and login to the account. Once you do, you’ll be greeted by the following Dashboard page.
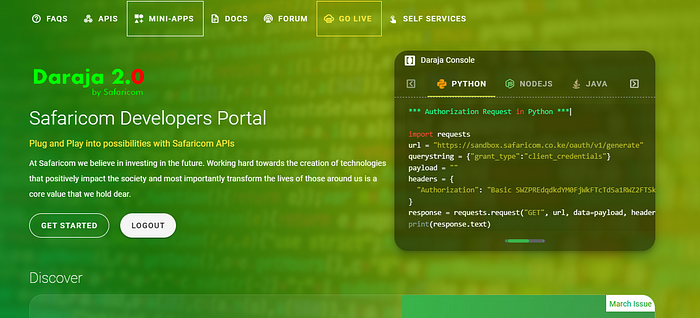
Click on the Go Live section. Fill in the details required, which include:
- The Organization Short Code (Paybill Number / Store Number if it’s a till).
- The Organization Name (Use the exact name that shows up on the Safaricom G2 Platform).
- M-PESA Username (I would recommend you use the Web Operator User we just created).
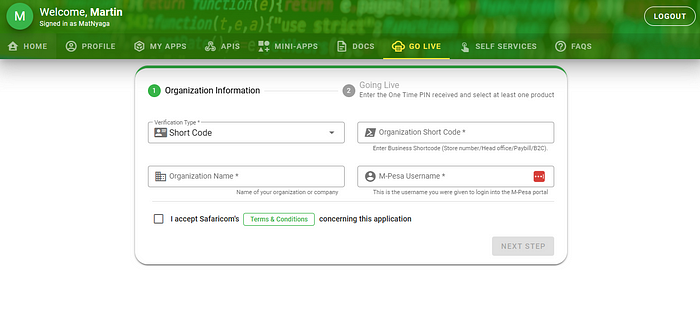
Accept the terms and conditions and proceed to the next step. Previously we required User testcases but that was thankfully removed (phew!). You will then receive an OTP and asked to select a product. You might as well check everything available.
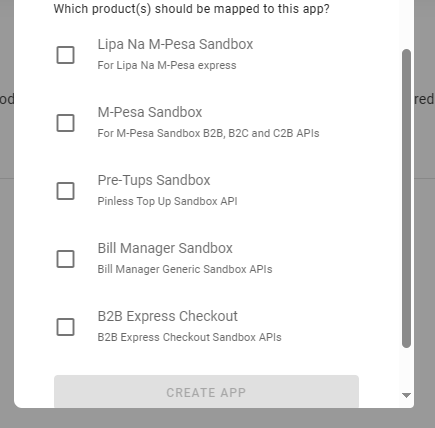
Once that is done, you can now create an app (An app provides the credentials necessary). It may take some time for it to be approved. Once done, to view the app created, click on the highlighted dropdown.
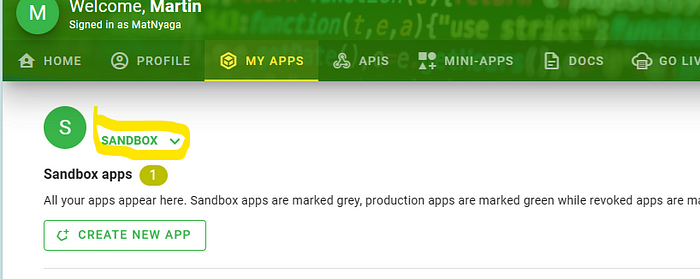
You’ll now view the app details as shown below
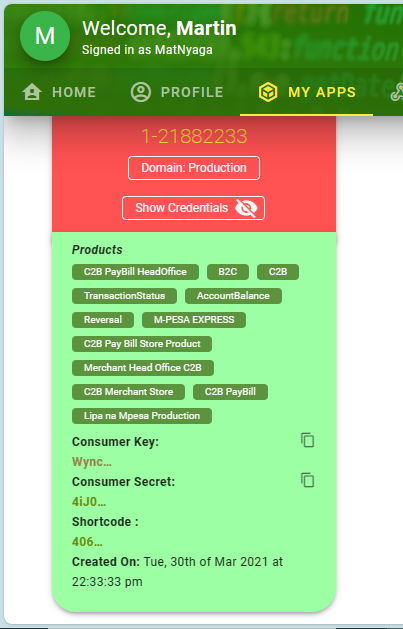
Congratulations!!! You now have the consumer key and consumer secret, however we still need the passkey. Fortunately, the pass key will be emailed to you a little later after the app is activated. Be sure to check all folders including spam to find it.
Please Note:
Unfortunately, there’s a bizarre error that occurs if you received your Paybill earlier than the creation of this V2 platform especially if you received the pass key a little earlier. Some V2 apis do not work! You will have to change the url to include v1 to account for this. If you are in a position where you don’t know how long ago the customer Paybill was created, account for both scenarios e.g.
Try the first url: https://api.safaricom.co.ke/mpesa/c2b/v1/registerurl
if it fails, switch to v2: https://api.safaricom.co.ke/mpesa/c2b/v2/registerurl
Hopefully this helps a couple of those devs out there who don’t know why some Paybills are not working.
With that you are now done. Feel free to reach out if you encounter any issue and best of luck on your application!
![]()


![[Resource]: Installing Webuzo on Your Nestict Cloud VPS: A Detailed Guide](https://www.blog.nestict.com/wp-content/uploads/2024/12/image.webp)
![[Resource] : Comprehensive List of Equity Bank Codes Across Kenya by Region](https://www.blog.nestict.com/wp-content/uploads/2024/12/image-5.png)


![[Continuation]: Current Challenges in Making Physics and Geography Compulsory](https://www.blog.nestict.com/wp-content/uploads/2024/12/The-universe-of-mathematics-physic-and-astronomy-its-ama…-Flickr.jpg)
![[Resource] : Why Physics and Geography Should Be Compulsory Like Mathematics in Education](https://www.blog.nestict.com/wp-content/uploads/2024/12/image.png)

![[LINKTREE] 2024 PAST PAPERS , NOTES ,RESOURCE,REVISION,EXAMINATIONS](https://www.blog.nestict.com/wp-content/uploads/2024/10/SCHM.jpeg)


![Maritime Terms, Abbreviations and Acronyms [Shipping Terms – Searchable]](https://www.blog.nestict.com/wp-content/uploads/2024/09/Container-Stowage-Stock-Illustrations-–-71-Container-Stowage-Stock-Illustrations-Vectors-Clipart-Dreamstime.jpg)
![Maritime Terms, Abbreviations and Acronyms [ Shipping Terms]](https://www.blog.nestict.com/wp-content/uploads/2024/09/image.png)


![[Explainer]: NVMe storage, SSD (SATA SSD), and HDD](https://www.blog.nestict.com/wp-content/uploads/2024/08/Laptops-are-available-with-SSDs-and-HDDs.png)


![[Updated 2024] – Passport Application FOR CHILDREN ONLY(PERSONS UNDER 18 YEARS)](https://www.blog.nestict.com/wp-content/uploads/2023/09/keppp-240x172.png)
![[Updated 2024] -Passport Application FOR ADULTS ONLY-PERSONS OVER 18 YEARS](https://www.blog.nestict.com/wp-content/uploads/2023/09/EAF-Passport-e1631045054464-400x800-1-240x172.jpg)


