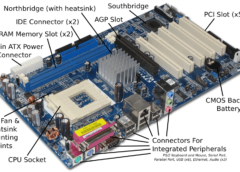
Virtualization in Windows 10 allows users to run multiple operating systems simultaneously on a single physical machine using virtual machines (VMs). This is achieved through hypervisors, such as Hyper-V, which manage the hardware resources and allocate them to different VMs.
Key Features of Virtualization in Windows 10:
- Hyper-V: Built-in hypervisor in Windows 10 Pro, Enterprise, and Education editions. It allows the creation and management of VMs.
- Resource Allocation: Efficiently allocate CPU, memory, disk space, and network resources to VMs.
- Snapshots and Checkpoints: Create snapshots of VMs to save their state, allowing easy rollback in case of errors.
- Isolation: VMs are isolated from each other and the host, enhancing security and stability.
Enabling Hyper-V on Windows 10
- Check System Requirements: Ensure your system meets the requirements for Hyper-V:
- 64-bit Windows 10 Pro, Enterprise, or Education.
- 64-bit processor with Second Level Address Translation (SLAT).
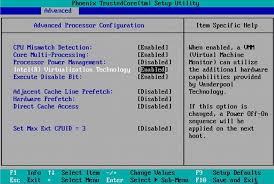
- BIOS-level Hardware Virtualization support (Intel VT or AMD-V).
- At least 4 GB of RAM.
- Enable Hyper-V:
- Open Control Panel.
- Go to Programs > Turn Windows features on or off.
- Check the box for Hyper-V and click OK.
- Restart your computer when prompted.
- Create and Manage VMs:
- Open Hyper-V Manager from the Start menu.
- Use the New > Virtual Machine wizard to create a new VM.
- Configure the VM settings, such as CPU, memory, disk space, and network.
- Install the desired operating system in the VM.
Converting a Virtual Machine to a Physical Machine (P2V and V2P)
P2V (Physical to Virtual) involves converting a physical machine to a virtual machine, which is commonly done using tools like Disk2vhd. However, converting a virtual machine to a physical machine (V2P) is more complex and involves several steps:
- Prepare the Physical Machine:
- Ensure the physical machine has compatible hardware drivers for the operating system in the VM.
- Create backups of important data on the physical machine.
- Export the VM:
- In Hyper-V Manager, right-click the VM and select Export.
- Choose a location to save the exported VM files.
- Create a Disk Image:
- Use a disk imaging tool like Acronis True Image, Clonezilla, or Macrium Reflect.
- Create a disk image from the VM’s virtual hard disk (VHD/VHDX).
- Restore the Disk Image to the Physical Machine:
- Boot the physical machine using a bootable USB or CD/DVD with the disk imaging tool.
- Use the tool to restore the disk image to the physical machine’s hard drive.
- Configure the Physical Machine:
- After restoring the disk image, boot the physical machine.
- Install necessary drivers for the hardware components.
- Adjust any system settings to ensure proper operation.
- Reactivate Windows:
- Depending on the licensing, you may need to reactivate Windows due to hardware changes.
![]()



![[Resource]: Installing Webuzo on Your Nestict Cloud VPS: A Detailed Guide](https://www.blog.nestict.com/wp-content/uploads/2024/12/image.webp)
![[Resource] : Comprehensive List of Equity Bank Codes Across Kenya by Region](https://www.blog.nestict.com/wp-content/uploads/2024/12/image-5.png)


![[Continuation]: Current Challenges in Making Physics and Geography Compulsory](https://www.blog.nestict.com/wp-content/uploads/2024/12/The-universe-of-mathematics-physic-and-astronomy-its-ama…-Flickr.jpg)
![[Resource] : Why Physics and Geography Should Be Compulsory Like Mathematics in Education](https://www.blog.nestict.com/wp-content/uploads/2024/12/image.png)

![[LINKTREE] 2024 PAST PAPERS , NOTES ,RESOURCE,REVISION,EXAMINATIONS](https://www.blog.nestict.com/wp-content/uploads/2024/10/SCHM.jpeg)


![Maritime Terms, Abbreviations and Acronyms [Shipping Terms – Searchable]](https://www.blog.nestict.com/wp-content/uploads/2024/09/Container-Stowage-Stock-Illustrations-–-71-Container-Stowage-Stock-Illustrations-Vectors-Clipart-Dreamstime.jpg)
![Maritime Terms, Abbreviations and Acronyms [ Shipping Terms]](https://www.blog.nestict.com/wp-content/uploads/2024/09/image.png)




![[Explainer]: NVMe storage, SSD (SATA SSD), and HDD](https://www.blog.nestict.com/wp-content/uploads/2024/08/Laptops-are-available-with-SSDs-and-HDDs.png)





![[Updated 2024] – Passport Application FOR CHILDREN ONLY(PERSONS UNDER 18 YEARS)](https://www.blog.nestict.com/wp-content/uploads/2023/09/keppp-240x172.png)
![[Updated 2024] -Passport Application FOR ADULTS ONLY-PERSONS OVER 18 YEARS](https://www.blog.nestict.com/wp-content/uploads/2023/09/EAF-Passport-e1631045054464-400x800-1-240x172.jpg)

